Audio Editing With Audacity
The Makery offers an array of audio equipment and expertise to support your audio projects, whether you are creating an oral history, recording music, or making a podcast.
To get started, complete training and request a reservation (select “Recording”) or read further below.
Some of our audio equipment is only to use in The Makery, but you can borrow microphones and handheld audio recorders to take home through the Libraries’ Equipment Loans service. You may also find our recording studios or media workstations useful for your recording and editing needs.
About Audio
Audio, or sound, is a variation of air pressure, caused by the vibration of an object, like vocal cords or a guitar string or a hammer hitting a nail. That vibration causes the surrounding air to vibrate: sound! Much like our larynx can create sound by creating vibrations, our ears can pick up those vibrations.

We can use an electromagnet to create sound from electricity: by placing a coil of wire near a permanent magnet, attaching a paper cone to it, and then turning electricity to it off and on very quickly. This is a speaker: it causes the air around it to vibrate. We can also make a microphone in a similar way: its vibration against the permanent magnet, picked up from the vibration of the surround air, causes the electromagnet to move, which creates electricity. We can record that electrical representation of sound to a magnetic tape or a vinyl record, or we can take samples of it tens of thousands of times per second, and record and playback those samples using a computer.
Representing Audio Waves as a Waveform
Audio, whether it’s sound in the air, or electricity down a wire, can be represented as a wave, with the amplitude of the wave representing how loud it is – how big the vibration is – and the frequency of the wave representing its pitch – whether it’s a low thud or hum, or something in the middle like someone saying “ah”, or something very high like hissing.

A very pure sound like from a flute or a tuning fork will look like a pure sine wave. A raspy sound like a washing machine or a librarian going “shhhh” will be a very complex wave. In practice, sound captured by a microphone (or our ears) will nearly always be a complex wave – lots of different sounds of differing volumes stacked upon one another. The visual representation of this is called a waveform.
Amplitude (“Volume”)

Above is a pair of stereo recordings as shown in Audacity – the left and right tracks of a recent song from a CD, followed by the left and right tracks of the same song on a vinyl LP record. You can tell from the vertical size of the waveform how loud it is – its amplitude. Note the top recording is much louder in general than the bottom one.
Recording The Voice

The voice is a set of complex sounds: long throated sounds (vowels) with shorter, higher sounds in between (consonants). Above is the waveform produced by an English speaker saying the word “Wikipedia”. Note how the letters ‘K’ and ‘P’ are very high-frequency sounds and stand out a bit from the rest of the word. ‘D’ and the transition from ‘iy’ to ‘ah’ are also noticeable, but to a lesser extent.
Audacity
Below is a link to the Audacity website, where the latest version is freely available to download and use.
- Audacity: A free, open source, cross-platform audio editor and recorder.
Importing and Listening To Audio
Audacity, like most digital audio workstations (DAWs) shows a waveform of a recording on a track. It shows one or multiple tracks on a timeline. Time runs from left-to-right.
Step 1: Find a file to edit
Audacity can import many common audio file formats, including WAV, AIFF, and MP3.
Step 2: Import the file into Audacity
Import an audio file by selecting File > Import > Audio….
Or drag and drop the file onto the timeline
Once you have that, you will see a waveform of your sound:

Step 3: Look at the waveform
This image above shows a stereo waveform. The left channel is displayed in the top half of the track and the right channel in the bottom half. The track name takes the name of the imported audio file (“No Town” in this example). Where the waveform reaches closer to the top and bottom of the track, the audio is louder (and vice versa).
The ruler above the waveform shows you the length of the audio in minutes and seconds.
Step 4: Listen to the imported audio
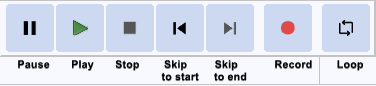
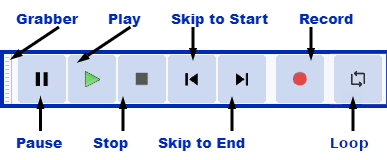
The image above shows Transport Toolbar.
Click the Play button to listen to the audio. Click the Stop button to stop playback. If you do not hear anything, see Audacity Setup and Configuration.
You can use the Space key on the keyboard as a shortcut for Play or Stop.
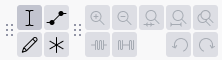
Click on Selection Tool ![]() then click on the waveform to choose a place to start, then click the Play button. Click and drag to create a selection, and then when you click Play button only the selection will play.
then click on the waveform to choose a place to start, then click the Play button. Click and drag to create a selection, and then when you click Play button only the selection will play.
- Clicking the Skip to Start button or pressing the Home key will move the cursor to the beginning of the track. It is like rewind, but it is not for playback – it will only work when playback is stopped. Similarly, clicking the Skip to End button or pressing the End key will move the cursor to the end of the track.
- To jump the playback position forwards or backwards from where it is now, click on the Timeline above the waveform at the point you wish to hear.
Recording from a Microphone
Recording Overview
- Set the Recording Device,
- monitor and then adjust the recording level,
- then press the Record button.
Correct adjustment of level before recording is essential to avoid noise or distortion.
Recording Step-by-Step
Set the Recording Device either in the Audio Settings Preferences, via the “Audio Setup” button in the toolbar, or via the menu: Edit > Preferences.
- Setting the Audio Host: The ‘audio host’ is the part of the computer’s operating system that handles audio. For historic reasons / compatibility with older audio hardware, you have a choice.
- On Windows, the choice is between the following audio interfaces. If WASAPI works, use it. If it doesn’t, use DirectSound. If neither works, try MME.
- MME: This is the Audacity default and the most compatible with all audio devices.
- Windows DirectSound: This is more recent than MME with potentially less latency.
- Windows WASAPI: This host is the most recent Windows interface between applications (such as Audacity) and the audio interface driver. WASAPI was first officially released in 2007. WASAPI is particularly useful for loopback recording of computer playback. 24-bit recording devices are supported using this host.
- On Mac the only choice is Core Audio.
- On Linux there is often only one option: ALSA. Other options could include JACK (Jack Audio Connection Kit), which is useful for recording.
- On Windows, the choice is between the following audio interfaces. If WASAPI works, use it. If it doesn’t, use DirectSound. If neither works, try MME.
- Recording Device
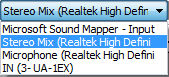
Choose the built-in or attached sound device that you want to use for recording.In most cases (for example, the inbuilt computer sound device), each entry for recording device consists of the type of device (such as microphone), followed in parentheses by the name of the sound card manufacturer.- On Mac, the internal sound card recording inputs are usually referred to as “Built-in”.
- On GNU/Linux, recording is often managed by the pulse sound server. It is normally best to select “default”.
- Recording Channels
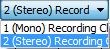
- 1 (Mono), 2 (Stereo) or the number of channels that are provided by the drivers of your sound device. On most inbuilt sound devices, especially on Windows, only mono or stereo will be available.
- If your recording device is mono, such as most microphone ports for the inbuilt sound device, it is recommended to set the number of recording channels to “1 (mono)”. Selecting “2 (Stereo)” in Recording Channels may duplicate the mono source to both channels (merely producing a dual mono recording), or may give audio in one channel and silence in the other.
- Mono recording devices should also be set to 1 channel mono in the system or sound device control panel.
- Typically, USB audio devices with two inputs will send their first input to left/mono, and their second channel to the right channel of a stereo track.
Set Levels
- Click in the Recording Meter to start monitoring:

- Singing or playing the loudest part of what you are recording, adjust the recording level using the left-hand slider (the microphone slider) on so that the moving bars do not get too close to the right-hand edge of the meter (-12 dB is a good level to aim for).
Record!
- Press the Record button to record.
- Audacity will record until you stop the recording using the Stop button.
Microphone Pickup Patterns
Our minds are good at tuning out the unimportant bits. A microphone is limited by its design: it either picks up all the sounds from everywhere (an omnidirectional microphone) or from one specific region (a directional microphone, often named by its ‘pickup pattern’ – where in the air around it that it picks up a signal – this is often heart shaped, so directional microphones are often some variation of ‘cardioid’.)
Examples of mic patterns: (omnidirectional, figure-eight, and cardioid)
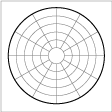


Regardless of whether the microphone is omnidirectional or directional, it should be placed close to the source of sound. If there are multiple sources of sound, then an omnidirectional mic should be placed close to equidistant from all of them.
High Signal-To-Noise Ratio
If you call the sound you want ‘the signal’, and all the background noise you don’t want ‘noise’, then you’re looking for a high signal-to-noise ratio.
With microphones, this can be achieved through careful placement, and with appropriate (loud but not distorting) setting of levels.
If digitizing a tape or vinyl album, or mixing music, your chief tool is appropriate (loud but not distorting) setting of levels.
Editing Audio
Transport Toolbar
See Transport Toolbar Instructions from Audacity.
Tools Toolbar
See Tools Toolbar Instructions from Audacity.
Edit Toolbar
See Edit Toolbar Instructions from Audacity.
Tracks and Clips
- An audio track is like one instrument in your symphony, or one voice in your podcast. You can add more tracks, and all of them will be mixed together to create your final output, but during editing you can manipulate each track independently. If you have an interview recorded with two microphones, each one can go in a separate track. If you have background music, that could go in a third track. You can move the whole track along the Timeline so that it plays at a different point in time in the mix, but until it is split you cannot move individual parts of it around.
- A clip inside an audio track is a separate section of that track which has been split so that it can be manipulated somewhat independently of the other clips in the track. For example, you can split an interview into separate clips for each sentence then move them around individually although they are all from the same track. Or you could move a clip to another track that is panned further right, or split it to a new, empty track. The new track only contains that single clip, so again you can only move that whole track unless you split it into multiple clips.
Working With Clips
Selecting Audio
Selecting a region using the mouse
The easiest way to select a region of audio is to click the left mouse button anywhere inside of an audio track, then drag (in either direction) until the other edge of your selection is made, then release the mouse.
If Selection tool is not selected (default setting), choose ![]() from Tools Toolbar, below:
from Tools Toolbar, below:
Selecting the whole of an individual track
The whole of an individual track can be selected by clicking in the Select button in the Track Control Panel to the left of a track.
Selecting the entire project
You can select the entire length of all tracks on screen with Select > All or use the shortcut Ctrl + A (or ⌘ + A on a Mac).
Splitting Clips
When you record some audio or import audio from a file, you get a single track. In many cases, there are natural gaps in the audio – silence between sentences or pauses between phrases in music. Those are good candidates for splitting the track into multiple clips, allowing you to move or otherwise manipulate those clips independently.
To split a clip at the cursor (or region), press Ctrl-I (or Cmd-I on a Mac), or, select from the menu: Edit > Audio Clips > Split.
Deleting Clips
Select a clip or region within a clip, then press the Delete key, or select from the menu: Edit > Delete.
Moving Clips
To move clips forward or backward in time, click on the header of a clip (the gray area with the clip’s title at the top of the clip) and drag it to the left or right.
Cut/Copy/Pasting
You can cut, copy, and paste selected audio just like words in a word processor, using Ctrl-X, C, and V (Cmd-X, C, and V on a Mac), or via the Edit menu.
Monitoring and Mixing
Adjusting Clip Volume with Envelopes
Envelope Tool
When you select Envelope Tool ![]() from the Tools Toolbar, your track, which normally looks like this:
from the Tools Toolbar, your track, which normally looks like this: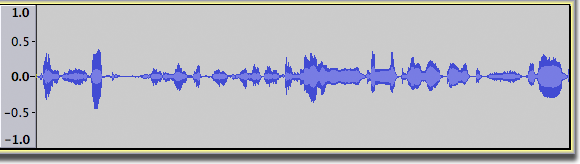
now has a thick blue border at the top and bottom of the waveform, like this: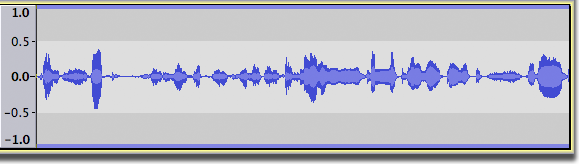
Control Points
An amplitude envelope is manipulated by a number of control points. Each control point is visible by its four handles (the small circles in the image below), by which you can drag the point up or down to control the volume level.
Dragging either the top or bottom handle ensures you can never distort the track by dragging outside its original volume envelope. Dragging an inner handle allows you to amplify a quiet piece of audio beyond the original volume envelope of the track.
Here’s an example of an amplitude envelope applied to the track. The volume is made to diminish slowly and then to grow again much faster (note the much steeper slope of the blue line). The volume is directly proportional to the height of the waveform – the smaller you make the waveform, the quieter it will sound: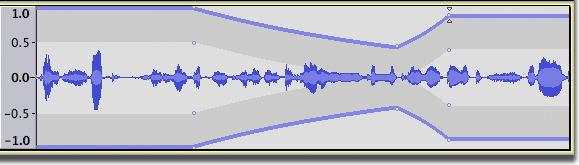
Click the mouse button anywhere in a track to create a new control point. To adjust a control point, click on the control point and drag it while holding down the left mouse button. To remove a control point, click on any one of its control points and drag it outside the track. Remember, you can also use Edit > Undo to undo your envelope changes in sequence.
Fades with the Envelope Tool
In this example we will create a fade that starts at full volume, then starts to fade slowly, then gradually more rapidly to silence, as illustrated here:
- Click on the waveform with the envelope tool at the “start position” of the fade.
- Drag the control point vertically to the nearest edge of the track to achieve full volume.
- Note that if you drag the point beyond the edge of the track, the control point will be removed.
- Click on the waveform with the envelope tool at the “end position” of the fade.
- Drag the control point up or down toward the vertical center of the track.
- Note that the fade will be almost silent for a large section of the fade.
Set a control point where the fade becomes silent. Begin the fade by setting a control point at the time position where the fade starts at full volume: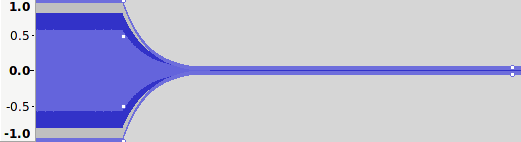
Click where you want to add additional control points as necessary to push out the envelope to the required shape.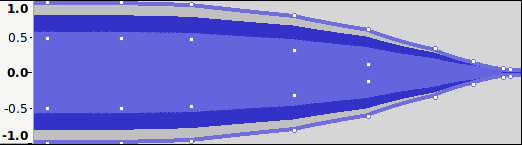
Working With Tracks
Track Control Panel
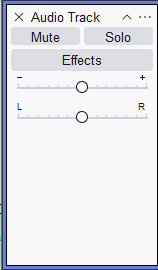
Mute Button:
Click to silence this track when playing. Click again to unsilence.
Solo Button:
Click to play just this track. Click again to release the button.
Gain Slider:
![]() Set the gain for this track. Hold down the shift key while dragging to adjust the slider in finer increments.
Set the gain for this track. Hold down the shift key while dragging to adjust the slider in finer increments.
Exporting Audio to a File
When you save an Audacity project with File > Save Project > Save Project you are doing just that – saving an Audacity project. Audacity projects can be opened only by Audacity. If you want other applications (such as Apple Music/iTunes or Windows Media Player) to be able to open this file you need to export it.
Before your first export, let’s simplify things a bit. Go to the Import / Export Preferences, and under When exporting tracks to an audio file uncheck “Show Metadata Editor prior to export step“. Metadata Editor adds extra information about the speech or music into the file – see For More Information below to learn more. You can go back to the Import / Export Preferences at any time if you ever want to re-enable Metadata Editor.
Exporting a WAV file
- Click on File > Export > Export Audio… – the standard “Save” dialog for your operating system appears.
- Give the file a different name. Audacity always suggests a name for the file that is the same as the name of your Audacity project. It is always best to alter this so you do not confuse your exported file with your Audacity project.
- Choose a location to save the file in the usual manner.
- At the bottom of the Save dialog is a dropdown menu labeled “Format“. From this menu choose “WAV (Microsoft) signed 16-bit PCM”.
- There are no options for the WAV file format, so there is no need to click the Options button.
- Click the Save button to complete the export of your project to a WAV file.
Exporting an MP3 file
The steps for exporting a file in MP3 format are the same as for a WAV file, except:
- In the Save dialog, from the “Format” menu, choose “MP3 files”
- Then click the Options button to set the bit rate and other options for the MP3 file.
What Format Should I Use When Exporting?
If you’re informally sharing the file with a friend, export to MP3. This may also make sense for submitting class projects and the like – check with your professor. If you intend to submit the file to a distribution system like iTunes, Anchor, Spotify, Audible, or save it for long term archival, then export to WAV.
Recording Zoom Meetings
Zoom has the ability to record each participant’s audio in a separate file. This allows you to import each person onto their own track within Audacity – which in turn allows you to adjust their volumes independently of one another, and to clean up places in a conversation when someone may be inadvertently talking over someone else.
Audacity Setup
In order for Audacity to be able to import the m4a format audio files that Zoom creates, you’ll first need to install an additional piece of open-source (free) software called “FFmpeg”. FFmpeg download link and installation instructions.
Zoom Setup
- Log into Zoom.us. Navigate to the left-hand column, click on Settings.
- Click on the Recordings header.
- Set a location you want to save the recordings to. Zoom gives you two options:
- LOCAL: saves files to your computer.
- CLOUD: saves files to your Zoom account
- preference: Local. Quicker to import files into your DAW if you need to edit, etc.
- Open Zoom App. Open Preferences (gear icon in top-right corner)
- Click on the Recordings header.
- Select folder to store Zoom files (Zoom will create a default folder in your Documents).
- Select “Record a separate audio file of each participant”, “Optimize for 3rd party video editor”, and “Record video during screen sharing”.

Recording the Meeting
- Once in meeting, select drop down next to Record (if no drop-down menu exists, click record and menu will appear) and choose “Record on this computer”.
- When you’re done, click Stop Recording. You’ll see a message in the top right corner that says “your file will be converted to an MP4 when the meeting ends”. Click END in the right-hand corner to end your meeting, then click End Meeting For All.
- Your Zoom meeting has now been recorded and is being converted into an MP4. Once your Zoom recording has been converted, Zoom will automatically launch Finder into the folder where your recording has been saved to.